Showing posts with label nail art. Show all posts

Sunday, 28 April 2013

Pastel Squared

Hey guys!
I swear I'm going to run out of names for these tribal inspired posts...please comment any suggestions - all are welcome ;)

Anywho, these are the nails I wore on the first part of my summer holiday. I used a peel of base coat so I wouldn't need to lug acetone as well as other stuff in my suitcase. It lasted a surprisingly long time, considering it's made to come of easily...


These were done using my Face of Australia pastels again, and I love the way they looked. Clean and simple.

What I used:
Aside from the FoA pastels, I used
ulta3 'blue heaven', 'eighties fuchsia', 'banana split', 'lily white'
essence 'wake up!', 'viva la green', 'black is back'

Thanks for dropping in!
xNai

Thursday, 25 April 2013

Black and Gold

Hey guys!
So this is how we know for certain I'm behind the times with my posts, because I'm only just showing you OPIs 'Just Spotted the Lizard'.

This is one of the polishes from the spiderman collection, released mid last year. I only got my hands on it late last year, so tried it out when I got the chance.

Pics after the jump.

Monday, 22 April 2013

That girl is on fire

Hello again!
So apparently I'm like the worst blogger known to mankind, what with all my unscheduled leaves of absence - life kind of takes over periodically, and my scheduled posts only last so long!
My apologies, dear readers.

Anywho!

Thursday, 4 April 2013

Aztec Love

Hey guys.

Today I have for you another foray into the Face of Australia pastels I bought a while back. This time I wanted them to be a little bit more punchy, and so did this tribal design with them.


It's quite simple, but really a striking look. What do you think? Something you'd recreate?


What I used:
ulta3 'lily white'
essence 'black is back'
Face of Australia 'boys 'n' berries', 'after dinner mint' and 'easy peasy lemon squeezy'

Thanks for dropping in,
xNai

Wednesday, 27 March 2013

The bread of our affliction

Hey guys!

So from Monday night until next Tuesday night it's Passover, the Jewish festival celebrating our exodus from Egypt among many other significant things.
One of the main signifiers of the festival is Matzah - unleavened bread - that the Jews made in their rush to leave Egypt. Now, many millennia later, we must still suffer through this wonderful experience.

I decided, thanks to Jenny over at 10 Blank Canvases and her excellent tutorial, to do matzah nails this year, instead of the 10 plagues I did last year, and these are them!


Mine are not quite as delicate as Jenny's, as I didn't have the right colours, or enough time really - had to get cooking for the feasts!


And here is me actually holding some matzah for a comparison. I couldn't find a piece of Yehudah matzah at the time, which is more colour accurate to these nails, but hey, you get the idea!

Anywho, wishing you all a chag kasher ve sameach!
xNai

Friday, 22 March 2013

Pastel Chagall

Hello...I've been expecting you...*strokes pure white cat with creepy look on face* (yeah, alright, so I'm weird...what were you expecting?)
ANYway...

This mani was inspired by the brand new (at the time) pastel collection put out by Face of Australia. It came at a 'FINALLY' kind of moment for me, because I had been scouring shops for pastels since about August, waiting for spring/summer because thats when all the pretty bright colours are released.
Everyone was raving about this collection, and I can see why. Have a look for yourselves:


These polishes are pastels, but so bright and punchy in their colour - just perfect for summer/spring!


I only have 5 of the 7 in the range, as the others (a dusty lavender/grey and a pretty pink) didn't really appeal to me.

Application for most of the colours was just amazing, considering their pastel nature. The purple, yellow and orange applied nicely to full opacity in 2 coats. The blue took three thin coats, but was easy to apply, whereas the green took 3 as well, but was a bit more temperamental - patchy at times. I've since been using Revlon 'Jaded' instead - almost a dupe in colour, and much nicer application.

What I used:
ulta3 'lily white'
Face of Australia 'boys 'n' berries' (purple), 'once in a blue moon' (blue), 'after dinner mint' (green), 'easy peasy lemon squeezy' (yellow), 'would you like some orange sherbet?' (orange)

While the names are adorbs, espesh the yellow and orange, they're a pita* to write or even talk about!

As always, thanks for stopping by!
xNai


*pain in the ass

Tuesday, 19 March 2013

French is overrated...

Hello again my darlings!

Today I have a quick and dirty mani for you.
I did this one Saturday morning when I was in a bit of a rush to go out, and had naked nails.
Since I started this whole adventure into nail art, I've become known for it among my friends and peers, and I knew I couldn't go out with nothing on my nails, even if it was as simple as these.

I decided to go for a sort of French mani with this nude and blue gradient, which didn't work as nicely as hoped (note the ring and middle fingers).
This picture also alerted me to my terrible habit of not filing my ring finger to the same shape as all the others! What the?!


Then I gave up on that time consumingness, and just did an actual french tip on the other hand.
I didn't want the blue to actually be the size of my free edge, as I thought that might end up being too much, so I just did a very thin tip, as you can see.


Clearly my frenching skills are in dire need of some improvement! eek!

What I used:
essence 'nude it!'
ulta3 'blue bird'

Anywho,
Thanks for stopping by, you gorgeous thangs you!
xNai

Saturday, 16 March 2013

Ziggy's Gift

Hey guys!
Today I've got some chevrons and gradients for you, on Danya's nails. Maybe one day you'll even get to see these girls' faces! 
All the rage at the moment, and so I decided to give it a bash, and put my own twist to it.


These are really bright in real life, with the blues positively popping off the nails.
I used more colours in the chevrons than in the ombré, to get the same fading effect. In future, I would probably use a different colour than 'Fly' for the second to last row, as it's a bit too green.


What I used:
(In order from darkest to lightest)
mode 'tatt-tastic'
essence 'walk on air'
Sinful Colors 'why not'
OPI 'Fly'
China Glaze 'For Audrey'
essence 'you belong to me'

As always, thanks for stopping by!
xNai

Wednesday, 13 March 2013

Fly away Peter, fly away Paul.

Hey guys!

Today I have for you the glorious Cotinga by Gloss 'n Sparkle (which I named, for the stunning turquoise cotinga bird).
Cotinga inspired this splotchy laser stripes mani, and it came out beautifully. 


Unfortunately I can't remember the polishes used for the splotches, but I can tell you that that gorgeous accent glitter is Cotinga, and let me tell you, it looks just as spectacular on light blues, purples, and even silvers as it does on black.
This is two very light coats of Cotinga, with no dabbing or placement required. Truly a delight to use!

As always, thanks for stopping by!
xNai

Saturday, 9 March 2013

The Forest of Tribes

Well hello there!
Today I have some fantastic green gradient, and fun tribal on top.

Let's start with the gradient itself

Green Gradient
For this, I used Essie 'Mojito Madness' and 'Navigate Her'. These look beautiful together.

Then, using Revlon 'Emerald' I drew some fine tribal detailing on the top, and after a day or two, I mattified them using Rimmel mattifying top coat.
Gloss Green Tribal Left
Gloss Green Tribal Right
Mattified Green Tribal

There's a tute for this design as well if you'd like to see it. It's a fairly straightforward design, but let me know in the comments if you'd like the step by step instructions.

Thanks for stopping by,
xNai

Wednesday, 6 March 2013

With ya head in the clouds

Hey guys!

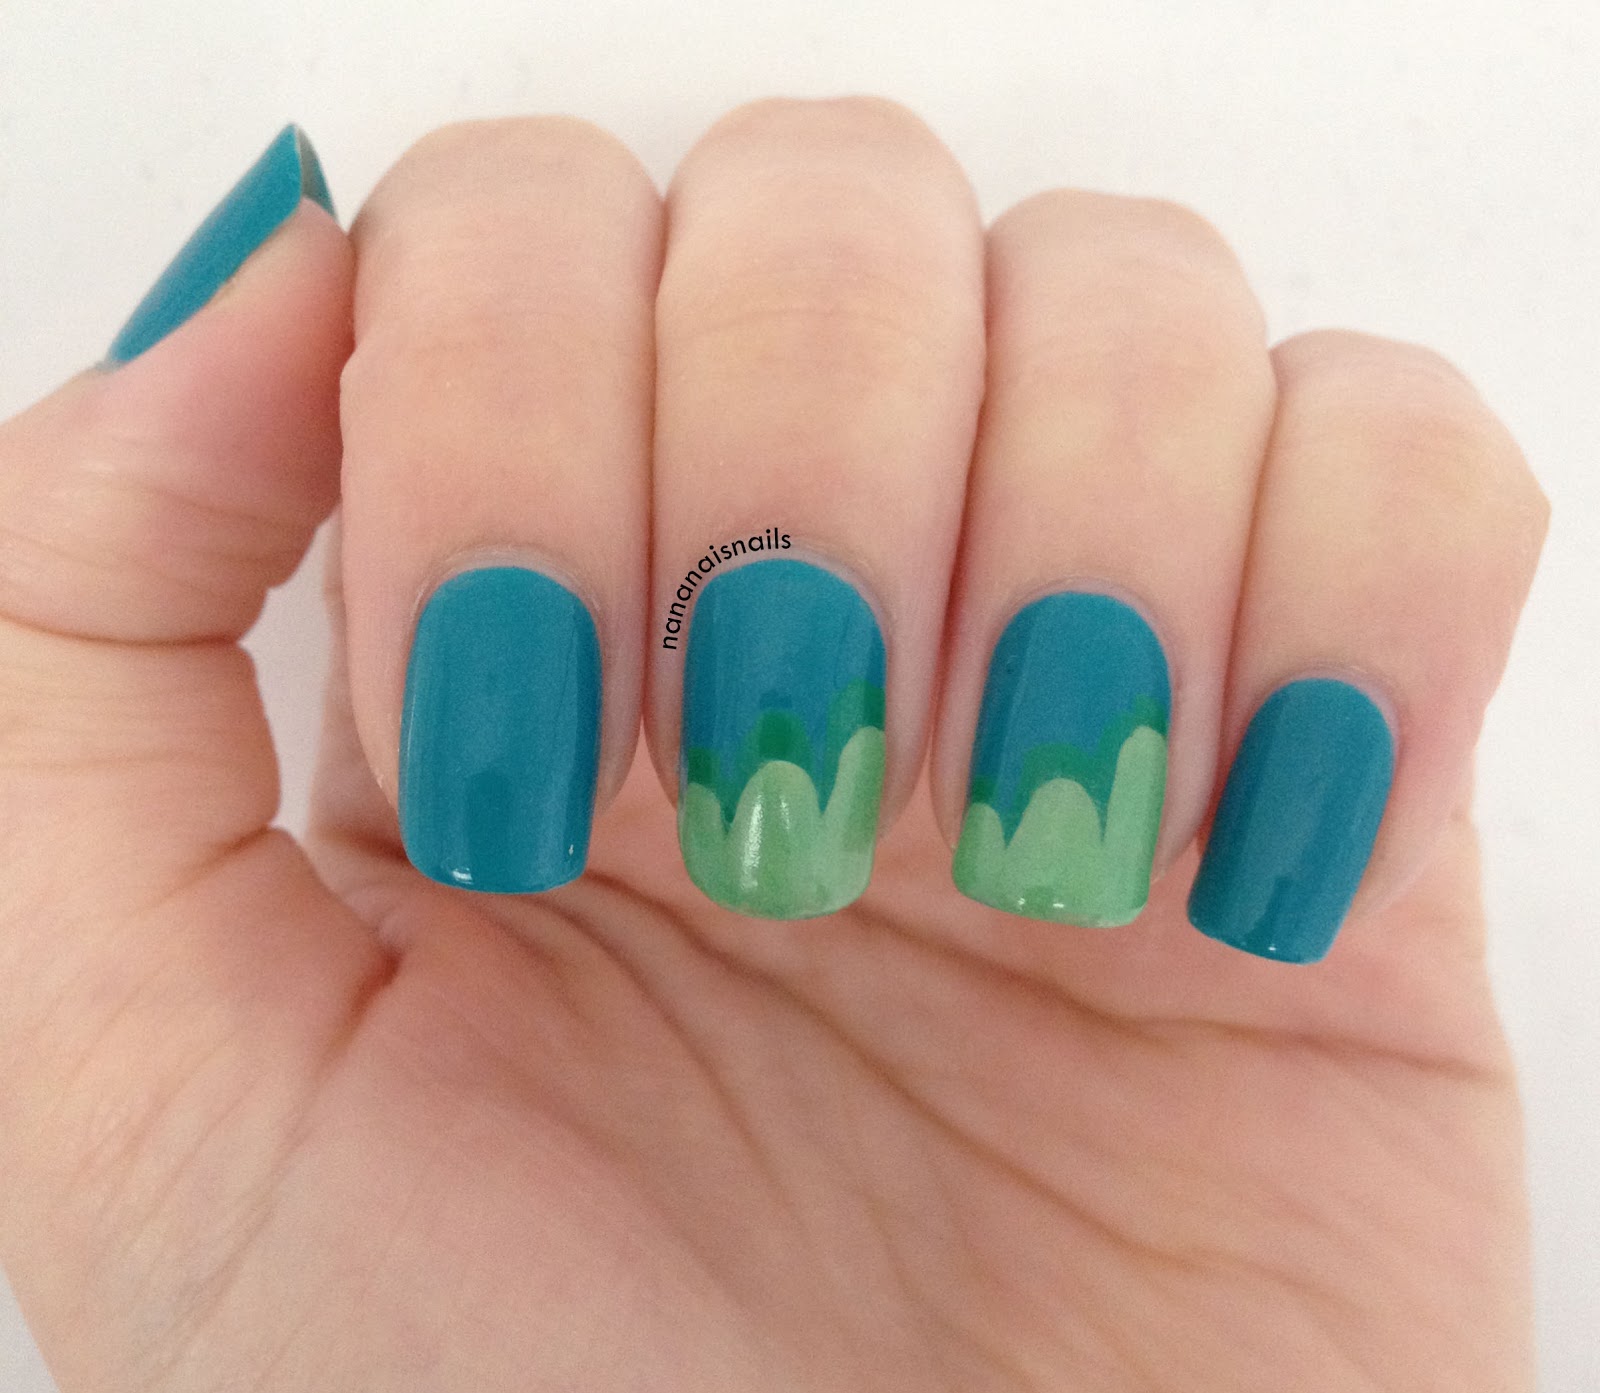
Today we have some simple clouds.
I had just received OPI 'Fly' and wanted to try it out. I love this blue, and think it works nicely with my skin tone, but didn't want to leave it too plain, and here we are!


The green at the tips is actually a glow in the dark polish, which sadly I couldn't get a decent image of, but had a lot of fun with in bed :)


What I used:
OPI 'Fly', and 'Zom-Body to Love' from the 2011 Halloween collex
An unnamed L.A. Colors green

Thanks for stopping by!
xNai


Wednesday, 27 February 2013

Argyle Dotticure

Hey guys!
As promised, here's the argyle dotticure tute. It's actually really very simple, and you can take this basic design and turn it into many different styles.

 What you'll need:
Two contrasting colours. Here I have Revlon 'Rock' and China Glaze 'For Audrey'.
Two different sized dotting tools


Paint your base coat and colour.

Using your large dotting tool, and place a column of dots down the centre of the nail.

On either side of the first column, place more dots, staggered from the first, as shown.

Using the smallest dotting tool, connect the large dots diagonally on one side, making sure to continue the little dots all the way to the edges of the nail.

Continue joining the large dots, and when done, top coat to seal in your design, and enjoy your super simple dotticure!


You can try matte top coats, glitter, and a myriad of other options!
Let me know how this goes for you, if you try it out.

xNai

Monday, 25 February 2013

Too hot for a sweater

Well hello there!
Today I have an argyle dotticure for you in both matte and gloss.

Argyle Dotticure - Gloss

Argyle Dotticure - Matte

What I used:
China Glaze 'For Audrey'
Revlon 'Rock' and 'Fierce'
Rimmel's Mattifying Top Coat

I'll be posting a tutorial for this mani soon, so keep your eyes peeled like an emperor's grape.

As always, thanks for stopping by!
xNai

Thursday, 21 February 2013

Passionfruit fields forever

Hello again!

Today I have for you my first attempt at watermarbling. 
Now don't laugh at this first picture, I was trying different combinations of colours, to see which ones might spread well enough to let me create designs.


I started from the thumb, and landed on a decent combination on the pinky.
I then proceeded to marble my left hand, and this is what it looks like!


This is Revlon 'Cotton Candy' and 'Passionfruit'
You can see on the index finger, that the flower is a little smudged.
I'm pretty sure it happened because I didn't clean the top of the water properly before pulling my finger out, and got some of the wet polish on the design.
Such a shame!


Very proud of these babies, they were my first successful watermarble!

Thanks for stopping by,
xNai

Sunday, 17 February 2013

Gradient half moons

Hello chickens.
As promised, here is a tutorial for the pink gradient half moons.

What you'll need:
Your two colours, I have pink (Essie's 'off the shoulder') and a white (Sally Hansen 'White Out')
A latex sponge with which to create the gradient
Glitter to place around the moon
Masking tape, foil and a toothpick.


First, paint your base coat and a coat (or two depending on your polish) of white.

Next, cut a semi circle out of the masking tape, and place it on the cuticle end of the nail.
Alternatively, you can use the rounded end of a bandaid, or a binder hole reinforcer, or any sort of rounded sticker.

Paint the two colours for the gradient onto your sponge in stripes, and dab it onto your nail.

You can repeat step 3 as many times as you like to achieve the desired intensity, but make sure you let each layer dry completely before applying the next layer, otherwise you'll pull up the layers below.

Once you've reached the colour intensity you want, pull the tape off quickly - you don't want the paint to dry too much on the tape.


Now you can do some glitter placement, if you like!
Paint some of the glitter polish onto the foil, and using your toothpick, pull out individual glitters, and place them where you'd like them on the nail.
I've used them around the moon, and as an added bonus, it helps cover up potentially dodgy lines...:)


Top coat and you're done!

Hope this is helpful.
Good luck, and I'd love to see your attempts!

xNai

Saturday, 16 February 2013

Once in a pink moon

Hello again there fellow nailies!
So sorry for my absence these past days, but I'm back!

Today I have for you some bright pink and white nails.


Sally wanted these to match a dress she was wearing to a 21st, so we did some pretty and simple half moons with a glitter placement twist.
On the ring finger I put OPI's 'I Lily Love You' for a little extra blang blang...

I'll be posting a tutorial for this design tomorrow.

What I used:
Essie 'Off the Shoulder'
ulta3 'Lily White'
OPI 'I Lily Love You'

Thanks for stopping by!
xNai

Saturday, 2 February 2013

New and Improved Zebra

Hey there!
Today we have some simple black and silver designs with a holo twist for Ilana.

Had to leave the ring in the frame - so prettiful!

Just some basic graphic black stripes, with simplified accents.

Intentionally slightly blurred to show the holographic goodness

And the beauty of it shimmers in the sun! Can you see the holo on the middle finger? Subtle but gorgeous.

What I used:
Revlon 'Metallic'
Gloss 'n Sparkle Spectraflair top coat.
No name black striper

Thanks for stopping by!
xNai

Tuesday, 29 January 2013

Double Dutch

Hello again DarlingHearts.

Today we have some more ombré, but with a twist!


I was inspired to do these by a graphic design @mpnails posted on Instagram (note: don't open the link if feet creep you out..), and just had to work it out.


To achieve this look, I did the background gradient first, and once that was completely dry with the aid of a top coat, I taped off the triangles, and did that gradient.

Love the way these look, and how completely vibrant they are! I chose contrasting colours to really add an element of oomph.

What I used:
Revlon 'Rock' and 'Siren'
Essence 'A Lovely Secret' and 'Raspberry Swirl'


Thanks for stopping by!
xNai

Friday, 25 January 2013

Red solo cup


Hello again!
Today’s nails were a challenge for me.
My friend, Sally, was going to an American ‘Frat’ themed party, and was dressing up as a cop. I discussed these with my brother, and he suggested college nails, so we came up with these!
They required some research, and I had to find some that weren’t identical – you wouldn’t believe how many of these colleges have the same colours, or similar logos!
My apologies for the dodginess of the pics, and the angles – been trying to teach Sally the way to pose hands…we’ll get there…:)

L-R: Yale, Princeton, MIT, Dartmouth, Harvard, NYU
Believe it or not, the fishtails on the pinkies were the most difficult part of this mani! They take ages, and the polish you use have to be one-coaters, otherwise it takes even longer.

L-R: Dartmouth, Harvard, NYU
L-R: Yale, Princeton, MIT
Then for the thumbs, we did some US flags, with glitter placement.

What do you think? Did I miss an obvious college with a different colour scheme?

As always, thanks for stopping by!
xNai