Saturday, 29 December 2012

No way, Monet!

Hello again!
I'm now officially back in the country, and though I'm sad to have left not only my friends behind, but the beautiful beaches etc, I'm glad to be home!

Today I have a swatch, and some awesome nails to boot.

This is 'Navigate Her' by essie, and it is a gorgeous sagey, avocado-y green. I received this in my first ever NailMail from my Floridian nail buddy, Nat. We do swaps every now and then, and as I had requested essies (never having had one before), she came through with this.
It needed two thin coats for full opacity. There was a bit of dragging and balding in the first coat, but easily remedied by the second. Isn't it a stunner?

With this gorgeous green, I decided to do a watercolour effect.

You can see an excellent tutorial for this effect here.

Unfortunately I can't remember which other colours I used for this design, my apologies readers! I should really have been writing these things down, but at that time I hadn't even dreamt of a blog!

Thanks for stopping by,
xNai

Wednesday, 26 December 2012

I'm nekkid!

Hello darling hearts!

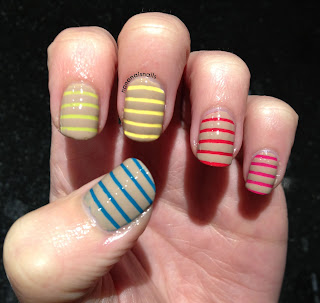
Today we have some nude and neons.
I had been seeing the nude and neon combo a lot recently, as it has been summer in the northern hemisphere (thank god we're finally there ourselves - I hate winter. HATE), and this is a nice subtle way to do the neon trend.

And yes, I'm aware that wasn't the right shade of nude for my winter fingers, but I bought it cos I know when I'm tanned, that should be about spot on. In the mean time, I could dream...:)

Then for a competition, I decided to add on some glitter, like so:


I had to fish through multiple coloured glitters, just to find the necessary colours, and let me tell you, the blue and the pink? NOT an easy task!!

What I used:
essence 'nude it!', 'wake up!' 'let's get lost'
Revlon 'Bubble'
Sally Hansen 'Mellow Yellow'
China Glaze 'Electric Pineapple'

And for the glitters:
Blue - Milani Jewel FX 'Teal'
Gold - essence 'make it golden'
Orange and Green  - Lush Lacquer 'dipping dots' (buy it and others here. Do it. Trust me.)
Pink - Wet n Wild 'Party of Five Glitters'

For all the glitters I used the glitter placement technique - paint it onto some foil, then use a toothpick to pull the indiv glitters out. Then I tried to put as much back in the bottle as possible, as I didn't want to waste too much.


Thanks for stopping by!
xNai

Tuesday, 25 December 2012

Yay December!

Happy 25th of December lovely followers!


xNai

Friday, 21 December 2012

Winged electric fruit

Hey guys!

Today's mani is one I am very proud of. I love the way it looks exactly how I wanted it to look - the colours are amazing, and the details worked splendidly.
Enough of patting myself on the back, and on with the show!

Gradient tribal nails!

To achieve this look, I did a gradient of China Glaze 'Electric Pineapple' and OPI 'Fly', and then painted the random tribalish designs on top with a black polish and a striper brush.
I particularly like the ring fingers and the index on my left hand.

As always, thanks for stopping by!
xNai

Monday, 17 December 2012

Locks, knocks and dots.

Hello again, fancy meeting you here!

Today I have for you some interlocking dots.
I had been wanting to try out this technique for flipping ages, since I saw it originally a while ago, but just couldn't work it out! Then I came across @slacquerr's tutorial on IG, and it ALL MADE SENSE!!

Here is my version

You can't really see the distinction between the pink and orange on the middle finger, which is a shame, but oh well, you get the idea!

What I used:
essence 'let's get lost!', 'passion for fashion', 'wake up!'
Revlon 'Bubble'
Sally Hanson 'Mellow Yellow'

Thanks for stopping by!
xNai

Thursday, 13 December 2012

Bleeding skulls

Hello there again!

Today's mani is one that I'm incredibly proud of. It's my first foray into actual legitimate artwork.

There was a competition put on by A Lacquered Affair and sponsored by Shoppe Eclecticco and Manglaze.
In said comp, the challenge was to take one of the Manglaze images, and be inspired by them on our own nails, or use matte finish, or use an actual Manglaze polish.

I decided to go literal, especially after searching through Manglaze's promo materials, and found these two images:


'What did you do with these images?', I hear you asking!
Well, fret not, my pretties, for I shall tell you!

I decided to combine the very bottom image of the one on the left, and the dripping blood portion of the one on the right, a little like thus:


Now prepare yourselves for the uncomfortably awkward positioning of the fingers. We've already established that my fingers don't join up nicely for images, so bear with me.


So what do you think?
Angela from Gloss 'n Sparkle also did some killer nails, and we both cracked the final five, and she won the comp, although it was very close!

I'm not going to get into the list of the nail polishes I used, cos there's a heap in there.

Thanks for stopping by!
xNai

Wednesday, 12 December 2012

And I'll cry if I want to!

Hello lovelies!

No nails today, I just wanted to drop past and say:


And a very exciting birthday it is. Just look at the date!
Not only is it 12/12/12, but I am turning 24, which is a multiple of 12! My next cool birthday won't be for 12 years, when I turn 36 on 12/12/24.
And yes, I did schedule this post to release at 12:12 on 12/12/12. Cos I can! ;)

Anywho, I'm going to get back to bathing in the beautiful Mauritian sunshine, on the stunning Mauritian beach, enjoying a delicious Mauritian cocktail with my friend, to celebrate this most auspicious day!

Speak soon chickadees!
xNai

Sunday, 9 December 2012

Laser Splotches

Hello!!
As promised, I have a tutorial for you here.

What you'll need:
At least 3 colours - they can be in the same family, as these are, or they can be highly contrasting,
it's just about your own taste
Black, White, base and top coats
Striping tape
Cosmetic sponge (stupidly not pictured...*facepalm*)
Clean up brushes, q-tips and acetone/remover


Paint your base coat, and then a coat (or two) of white.
I use white here, like I do everywhere, to really make the colours pop. You could use the lightest of your colours as a base colour (like in any gradient nails), but I like being able to blend the edges out nicely (keep reading to see what I mean).

Paint a corner of your sponge with the first colour you'd like to use...

...and dab it onto your nails in any random pattern, making sure to leave enough blank spots for your other colours.

Cut the corner off, and repeat steps 2&3 with the next colour.

Repeat step 4 with the next colour.

I didn't like that the pink covered so much of the purple at the bottom of the nail, so I went over it very lightly with the purple again to blend the edges together a little better.

Clean up the edges using the q-tips for larger areas on your skin, and a small brush for the area right next to the cuticle.

Leave your nails to dry completely (you can use a fast dry top coat here to speed the process, or like me, you can read a book for 10 mins), and then apply the striping tape in any way you like.
I prefer the randomness of the laser effect for a mani like this.

Next, one nail at a time, paint over the nail with your black (or any other one coater colour you'd like to use), and remembering the order in which you placed the tape initially, peel it off quickly but carefully.

You'll be left with this wonderful result, with patches of colour showing through.


Don't forget to top coat your design, to protect your work, and you're done!


This is what the finished effect of mine looked like.
I decided to do it just as an accent nail, mostly because I ran out of time, but also because I really love the ombré effects on the nails.


Please feel free to leave me a link to your attempt of this design, I would love to see them!

Hope this has been helpful,
xNai

Friday, 7 December 2012

Rorschach Fun

Hello there lovelies!

So today I have for you what I've been calling splotchy ombre stripes. Really awful name, I know, so please, if you can come up with something better, tell me!!

These I did for Orit, as she was going to Lady Gaga that night. The pink you can see is UV reactive polish, in case there were black lights, and I coated the whole thing in glow in the dark top coat, under the black, so the stripes would glow!

Orit loved them, and to show how rockin' she thought they were, she even did the following pose for my pics:

Then we went for coffee with some friends, and Ilana saw them, and decided she wanted them as well! Back to my house we went, and I did these on top of her purple shellac. I love Ilana's nails - such long beautiful nail beds! They make me so jealous...

What I used:
BYS 'Bright Purple N288', 'Blue N283' (both colour change polishes),
'02 UV Tension Rising' and their Glow in the Dark top coat.
OPI 'Black Onyx'


Lucky you, there's a tutorial for these babies!
I shall post it probably tomorrow, or the day after, sorry for the delay...:(

Hope you love these as much as I did!
xNai

Sunday, 2 December 2012

Patchwork Hearts

It's tutorial time!

Today's tute is brought you you by awesomeness and love.

What you'll need: 
Two shades of one colour (I have two blues)
A highly contrasting colour (my white)
Multiple sized dotting tools
A paintbrush/striper in the same colour as your contrasting colour (white)


Start by painting your base coat and the lighter shade of colour.
I have used essence 'you belong to me'

Next use the larger dotting tool (I used the back of a paintbrush) and place 2 dots right next to each other, as shown. Work out which direction you want the heart to go before placing the dots.
You want to not place the dots too close to each other, as these form the 'bum' of the heart, so there needs to be some decent curviness to it. (hehehe...bum...curviness...that's right, I have a gutter brain. Leave me alone! ;))

Repeat this with the medium dotting tool as well, so you have varied heart sizes.

Using the paintbrush/striper, create the point of the hearts, and join them all up.
I did this by placing a dot where I wanted the point to be, and then drew the lines to meet the edges of the dots, and filled in the space.

After the hearts are complete, using the smallest dotting tool (I used a toothpick), place some very small dots around the hearts, filling in the empty space.

Take the darker shade (essence 'walk on air') and very carefully outline the largest heart. It doesn't ned to be perfect, but try to keep it fairly thin.


Using the dark shade again, make little stripes across the outline, to create the stitches effect, as shown.


Top coat to protect your design, and voila!
Adorable patchwork hearts.


Please feel free to leave me a link to your attempt at this design, I would love to see it!

Hope this has been helpful!
xNai

Stitched up heart

Hello there again!

Today is the wedding, and I am probably very excited! (I say probably, because I'm writing this a full 2 weeks before, so I have to assume...;) )
I'm probably also very excited that it will soon be over, and life can go back to normal...XD


Alas, today is another one picture post, but with this one comes a tutorial as well! Rejoice!

I refer to these as my patchwork heart nails.
Patchwork Heart Nails
I especially love the glitter on the ring finger - it's essence 'blue addicted' which is a stunning royal blue jelly with medium and tiny blue hexes in it. Sadly it's not part of their new line, so I'm glad I stocked up! This was probably the first glitter I've actually really liked. I'm not much of a glitter girl, but this was the beginning of my conversion...:)

What I used:
essence 'you belong to me', 'walk on air', 'let's get lost!'
ulta3 'lily white'
Striping tape from ebay

Stick around for a tutorial a bit later!
xNai